DIY Clothing Easy How To Make Old Sweaters Attractive
It wasn’t my intention to DIY clothing. I was just looking through old drawers. Usually I find some clothing that I forgot about. It’s like buying something new. This time I found an old sweater that had been one of my favorites but stopped wearing.
Purge, purge your closet – but
The first step in finding your own personal style is to clean out your closet. Make piles of keep, donate and trash. But maybe don’t be so quick to discard what you don’t want to keep. Luckily my donate pile was still in my spare bedroom.
Why did I stop wearing my sweater?
The sweater looked perfectly fine. It’s from an excellent brand, Ann Taylor Loft. Pretty sure I got it on sale. So time to try it on and see why it was abandoned. This was certainly perfect for a DIY sweater project.
The ah ha moment.
 Well, as happens to the best of us, I’ve gained a few pounds around the middle. When I put on the sweater it was too short. Don’t remember if that was the style then or if it shrunk in the wash. Anyway, it hit me right in the middle of my tummy and looked ridiculous. See how the bottom sticks out hitting me in the wrong spot?
what to do? upcycle and repurpose.
While thinking about what I could do, I glanced over to my donate pile and saw two pieces that looked like they could look very cool added to the bottom of the sweater. Why not? There are all kinds of DIY sweater hacks on the internet showing how to upcycle and repurpose. Cut them up and make mittens, hats, scarfs and pillows. But I wanted to WEAR my old sweater again.
how to do it?
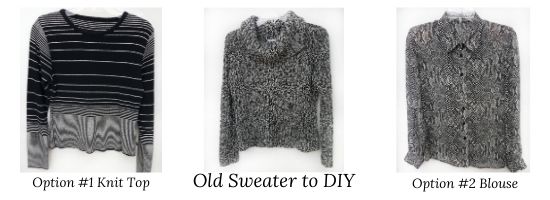
The two tops that I had were great. Both of them had the same colors as the sweater but each had a unique design. When diy clothing and mixing fabrics never try to match the designs. Use complimentary colors, but opposing designs.

Try the pieces together for style
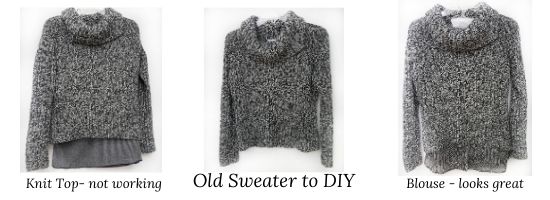
Next thing I did was to put each top under the sweater to get an idea of what it would look like. The knit top was too thick and heavy. I didn’t like the thickness of both the sweater and the top together. I loved the blouse under the sweater. The blouse fabric is very thin so it didn’t add any more bulk to my middle. The design is an animal print and blended perfectly with the textured sweater.

now to connect the pieces
In order to add the fabric to the bottom you will need to measure how much you want to show. Cut most of the top of the piece off leaving yourself a lot of fabric to work with and place under the sweater. Pin all around where you think you would like it. Try the sweater on being careful not let the pins stick you while putting on. You can then adjust what you don’t like by repining while you have it on.
If you have a sewing machine, sew the two fabrics together about an inch from the bottom of the sweater. You don’t really need a sewing machine. Most times you can just hand stitch around the bottom and make good knots to join the thread.

And voila!
Your DIY sweater is just like a new style fashion.
Enjoy it. It didn’t cost you anything.
Want some help in cleaning out your closet?

Sign up here to get my free closet clean out check list.
